Chapter 1: Dashboard
Chapter 1: Dashboard – Version 1
- Total income
- Customers
- Suppliers
- Orders
- Sales overview
- Orders overview
- Latest orders
- Best selling products
- Most viewed product
- New customers
- Reviews
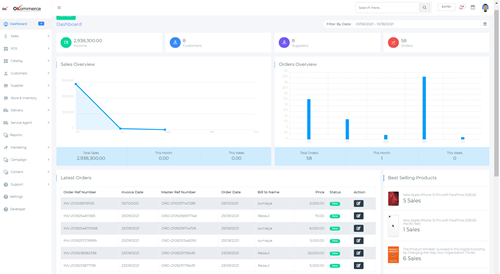 https://g1.okommerce.com/dashboard
Chapter 2: Sales
2.1 Orders
2.1 Orders – Version 1
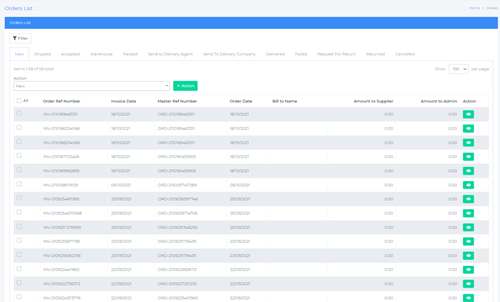
https://g1.okommerce.com/admin/orders
In the orders tab, you can view all the orders of your store. They are shown in reverse chronological order. The details of the orders shown include
- Order reference number
- Invoice date
- Master reference number
- Order date
- Bill to name
- Amount to supplier
- Amount to admin
The orders are also sorted by new, shipped, accepted, warehouse, packed, sent to delivery agent, sent to delivery company, delivered, failed, requested for return, returned, and cancelled.
You can also search a particular order by clicking on the filter button and searching by either the order reference number or the master reference number. This is shown in the image below:

https://g1.okommerce.com/admin/orders/1
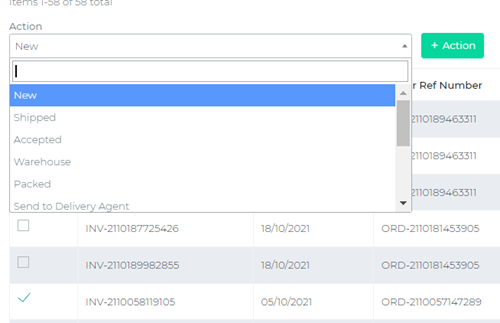
To manage an order, click on the box corresponding to the order, and under the ‘Action’ tab, select the status of the order you want to move to. Then click on the ‘+ Action’ button to complete the status change. This is shown in the image below:
https://g1.okommerce.com/admin/orders
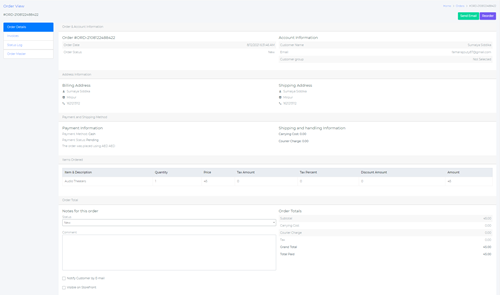
Order view
To view the order details of a particular order, click on the ‘eye’ icon corresponding to the order that you want to view. Here, you will find all the relevant information to that particular order which includes – Order and account information, address information, payment and shipment method, items ordered, and order total.
Along with the details, there’s also the option to mail the order details or reorder the order.
https://g1.okommerce.com/admin/order_view/10179?invoiceStatusId=1&invoiceId=10203
Under the order view page, you can also view the invoice, status log, and order master of that order.
Invoice generates a printable invoice of that order and contains all the information related to the order. It can also be exported as a PDF.

https://g1.okommerce.com/admin/order_view/10179?invoiceStatusId=1&invoiceId=10203
To view the status log of the order, click on the status log option and the status log will be generated. You can view the date, current status, previous states, the duration of the order, and notes, if there’s any.

Finally, the Order Master option lists the invoice number, date, total amount, received amount, and status of the order.

2.2 Service Orders
2.2 Service orders – Version 1
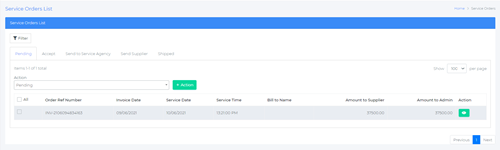
https://g1.okommerce.com/admin/serviceorders
This is where you will manage orders of the products that are classified as ‘services’. All service orders are shown with the following order information:
- Order reference number
- Invoice date
- Service date
- Service time
- Bill to name
- Amount to supplier
- Amount to admin
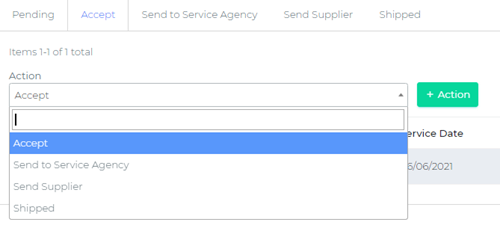
You can sort the service orders by pending, accepted, sent to service agency, sent to supplier, and shipped. To manage an order, click on the box corresponding to it and choose the order status you wish to apply. Then click on the ‘+ Action’ button to complete the status change. This is shown below:
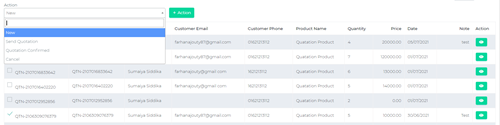
2.2 Quotation Orders
2.3 Quotation orders – Version 1

https://g1.okommerce.com/admin/quotation-product-orders
Here you can manage the orders of the products that are classified as quotation products. All quotation orders are shown with the following order information:
- Quotation number
- Customer name
- Customer email
- Customer phone
- Product name
- Quantity
- Price
- Date
- Note
- Action
The quotation orders are sorted as sent quotation, quotation confirmed, and canceled orders. To change the status of an order, click on the box corresponding to it and choose the order status you wish to apply. Then click on the ‘+ Action’ button to complete the status change. This is shown below:
https://g1.okommerce.com/admin/quotation-product-orders
Order view

https://g1.okommerce.com/Admin/QuotationProductOrders/Details/10026
The order view for quotation orders is different from the regular orders and service orders. There are no invoices, status log, and order master and the order details contain information such as order details, account information, and product details.
To send a quotation, click on the ‘send quotation’ button and enter the form details asking the expiry date, price, and notes and hit submit.

Chapter 3: POS
3.1 POS Settings
3.1 POS Settings – Version 1

https://g1.okommerce.com/admin/settings
Here, you can manage or remove your existing POS, or add a new POS. To do so, click on the ‘+Add POS Setting’
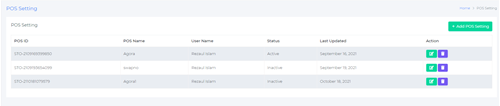
https://g1.okommerce.com/admin/PosSetting
Here, you can add the Name of the POS, choose the assigned member, and toggle the active status. Hit save to complete the adding process.

3.2 POS Details
3.2 POS Details – Version 1
Your newly added POS is now visible among all the POS in the system. Click on the open button to view the POS in detail. The POS detail looks like this:
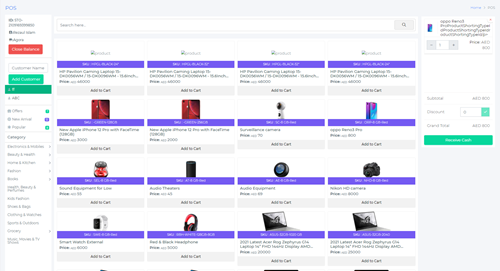
https://g1.okommerce.com/admin/pos_dashBoard
Here, the entire inventory under the POS is visible. You can search any particular product by typing the name in the search box. To add an item to cart, click on the ‘Add to cart’ button under that product. Products are categorized under the category section and also classified under Offers, New arrival, and Popular.
The list of customers is shown in the customers tab and there is also an option to add new customers by typing the name in the name field and clicking on the ‘Add Customer’ button.
Once you have added the necessary products to the cart for a particular customer, you can click on the ‘Receive Cash’ button.
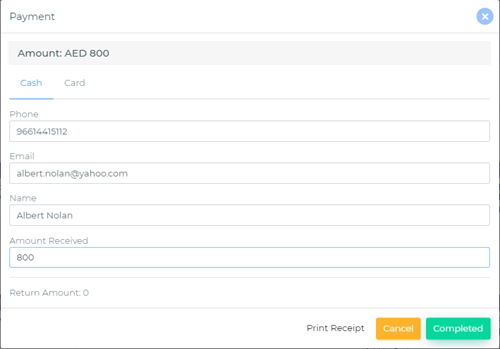
Depending on the payment method of the customer, you can either receive in cash or via card. Fill out the necessary information and click on the ‘Completed’ button.
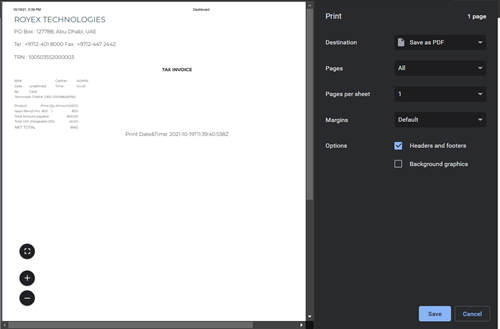
An invoice will be generated that you can either print or save as PDF.
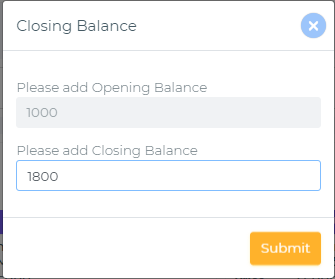
The sales process has been completed successfully. To close the balance of the POS, click on the ‘Close Balance’ button on the top-left corner of the screen. Enter the closing balance and hit Submit.
3.2 POS Report
3.2 POS Report – Version 1
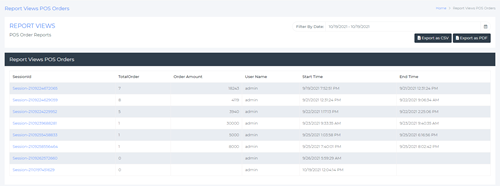
To generate the report of a POS, click on the report to generate a POS Order report.

https://g1.okommerce.com/admin/pos_list
The report contains the session ID of each session, total orders, order amount, username, start time, and the end time of the session. You can either export the report as a CSV file or export it as a PDF.
https://g1.okommerce.com/admin/pos_report?posSettingId=3
To view individual sessions, click on a particular session to view the invoice details under that session.
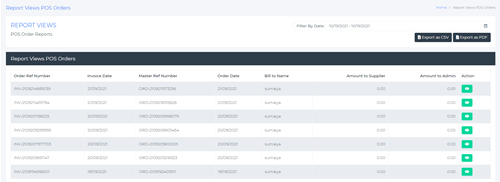
https://g1.okommerce.com/admin/pos_invoice_report?posSettingId=3&sessionId=Session-2109224672065
The following details are visible for the invoice orders: order reference number, invoice date, master reference number, order date, bill to name, amount to supplier, and amount to admin.
To view a particular invoice, click on the eye icon under the action column as discussed in Chapter 2. Again, you can export the invoice report as a CSV or PDF. You can also filter invoices by specifying the starting and ending date.
Chapter 4: Catalogs
4.1 Products
4.1 Products – Version 1
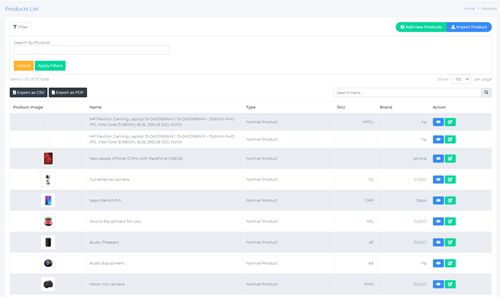
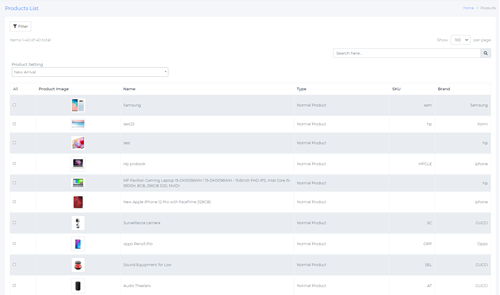
The product section contains all the products displayed in a listed format. The various details of the product shown include product image, name, type of product, SKU, and brand.
The type of product refers to the four types of products, i.e. normal products, digital product, quotation product, and service product. You can search for a specific product by clicking on the filter button and typing the name and hit the ‘apply filter’ button. You can also save the product list as a CSV or PDF file.
https://g1.okommerce.com/admin/products
To view an individual product, click on the ‘eye icon’ under the Action tab and the details for that particular product will be displayed.
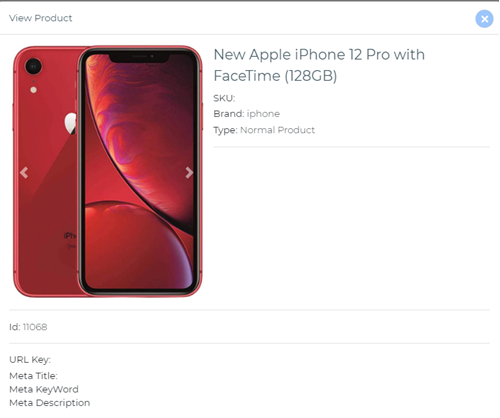
Here, you can find the product name, image, SKU, brand, type, and other relevant details.
To edit a product, click on the pencil icon under the Action tab and it will take you to the product details page where you can edit the product information.
https://g1.okommerce.com/admin/edit_product/11068
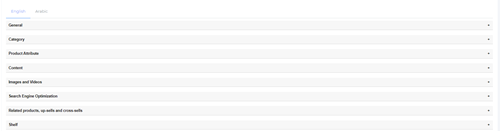
The product details are sorted categorically. Each classification is covered below:
General:
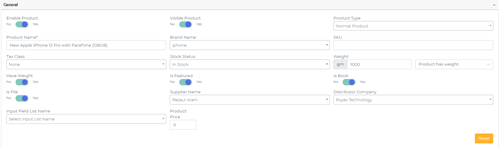
In the general settings, you can choose to enable or disable the product from the store. You can also choose if you want to make the product visible or not. Next, you can choose the product category, i.e. whether the product is a service, digital, quotation, physical, or a normal product.
You can also add product details such as the name, brand, SKU, tax class, supplier name, distribution name, and product price. You can also toggle between the product weight and specify the weight in grams.
Category:

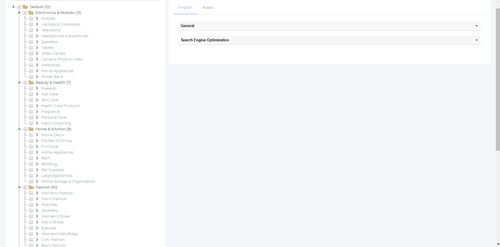
Category is fairly straightforward. You have to choose among the various product categories and choose the ones that’s relevant to the selected product. You can choose multiple categories for a single product. You can also search for a category in the search box.
Product Attribute:
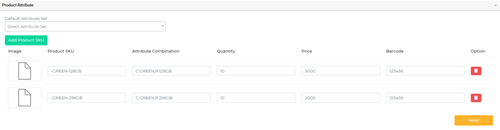
Here, you can assign an attribute set for the product. You can choose among the existing attribute sets or create a new one by clicking on the ‘Add Product SKU’. Once you have selected the product attribute set, you can now enter the other details such as quantity, price, and barcode.
Content:
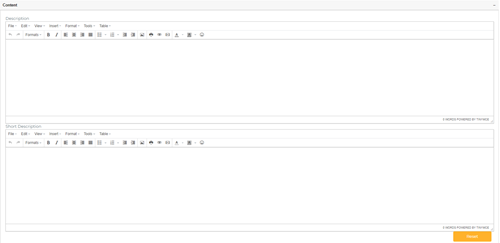
Here, you can add a long and short description of the product in the respective text boxes.
Images and Videos:
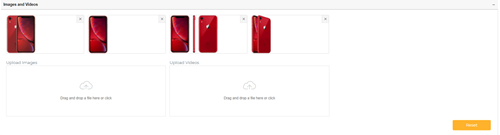
To enter product images and videos, either drag and drop a file in the upload section, or click to select a file from your computer.
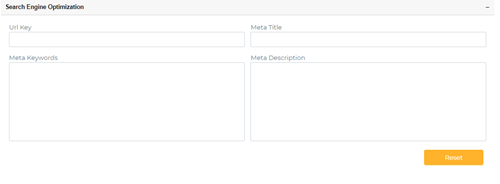
Search engine optimization:
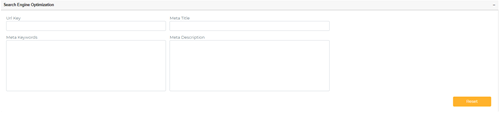
To optimize the product SEO, enter the details such as URL key, meta title, meta description, and meta keywords.
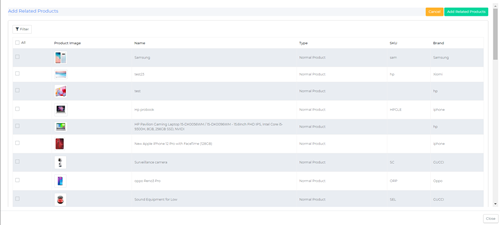
Related products, up sells, and cross-sells:

Add related, up-sell, or cross-sell products by clicking on the respective buttons. A new window will open where you can select the product to add.
Shelf:

Here, you can specify the warehouse, floor, shelf, row, and column of the product.
General:
Enter the name of the product in this section.
Service Product:
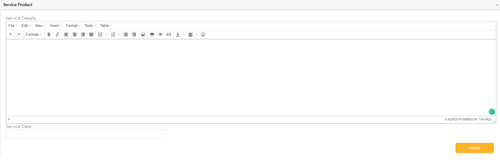
If the product is a service product, you can add the service details and the service date here.
Digital Product:
If the product is a digital product, you can add the digital product URL and product details here.
4.2 Category
4.2 Category – Version 1
In this section, you can manage all the categories of your products. The categories are added when you add a product. There are two settings that you can edit here, general and search engine optimization. There’s options to add these in multiple languages.
General:
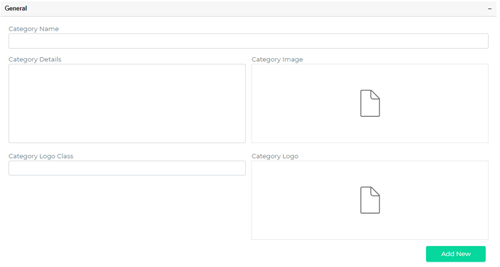
To add a new category, you have to add the category name, image, logo class, and logo and then click on the ‘Add New’ button. To edit an existing category, click on that category and you can edit out the details.
Search Engine Optimization:
Here you can include the URL key, meta title, meta keywords, and meta description of the category.
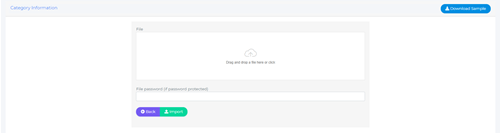
You can also import category/categories by clicking on the import button on the top-right corner of the category menu.
You can upload brands in bulk here. You can either drag and drop a file or click to upload from your computer. A sample file is available for download as well. Enter a password, if there is any, and click on the import button to complete the import task.
4.3 Brand
4.3 Brand – Version 1
In this section, you can manage all the brands of your products. The brands are added when you add a product or you can add one from here as well. There are two settings that you can edit here, general and search engine optimization. There’s options to add these in multiple languages.
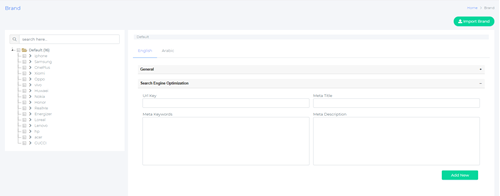
General:

To add a new brand, you have to add the brand name, details, image, and then click on the ‘Add New’ button. To edit an existing brand, click on that brand and you can edit out the details.
Search Engine Optimization:
Here you can include the URL key, meta title, meta keywords, and meta description of the brand.
You can also import brand/brands by clicking on the ‘Import Brand’ button on the top-right corner of the menu.
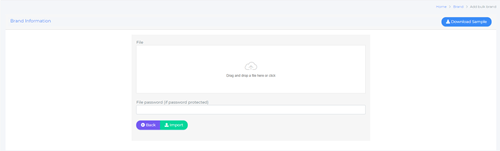
You can upload brands in bulk here. You can either drag and drop a file or click to upload from your computer. A sample file is available for download as well. Enter a password, if there is any, and click on the import button to complete the import task.
4.4 Product Settings
4.4 Product Setting – Version 1
In the product settings, you can manage all the products in that store. To change the product setting of a particular product, click on the box corresponding to it, and change the setting by clicking on the product setting drop down menu. Hit the ‘Submit’ button to confirm your change.
You can create these product settings by going to the Settings menu in the dashboard and then click on the product settings under the product menu. Here, you can create new product settings or edit existing ones. This will be shown in Chapter 15: Settings.
To search for a particular product, type the name in the search box or click on the filter button and type the name in the search box and click on the ‘Apply Filters’ button.
Chapter 5: Customers
5.1 Customer Dashboard
5.1 Customer Dashboard – Version 1
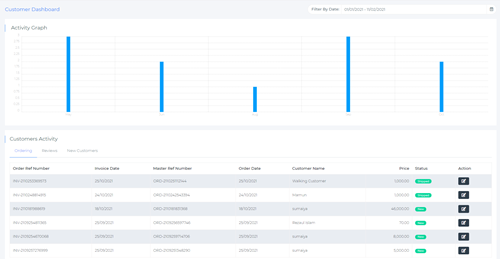
The customer dashboard provides an overall view of the customers. Firstly, select the range of date by clicking on the date filter. Based on the date chosen, an activity graph will be generated. The activity graph shows how many new customers there are at a particular time.
Customer Activity shows a list of recent customer orders, reviews, and new customers. Under the orders tab, we can see the most recent orders along with the order reference number, invoice date, master reference number, order date, customer name, price, status, and action. Clicking on the action button will take you to the order page of that particular order.
Reviews tab shows the latest reviews left by customers. Both pending and approved reviews are shown and there is the option to take necessary action for those reviews such as approving them, or deleting them.
The new customer tab shows the latest customers of the store. Customer name, group name, email address, phone number, date of birth are the information shown here.
5.2 Customer
5.2 Customer – Version 1

This page displays all the existing customers of the store with their details they provided during the registration. The customer name, email address, group, phone, address, total orders, and wallet information is displayed here.
To view a particular customer, click on the “eye” icon and the customer details will be displayed.
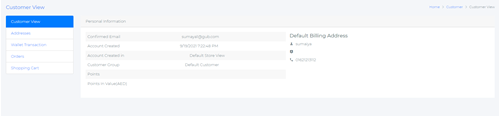
The customer view displays the email address, account creation date, customer group, points, and default billing address. In the addresses section, you can either edit the existing address or add a new one by clicking on the “Add New Address” button on the top right corner.

Here, you can add/edit the basic address information and hit the ‘Submit’ button when you are done. To delete a particular customer, click on the delete icon under the action tab.
To add a new customer, click on the ‘Add new customer’ button.
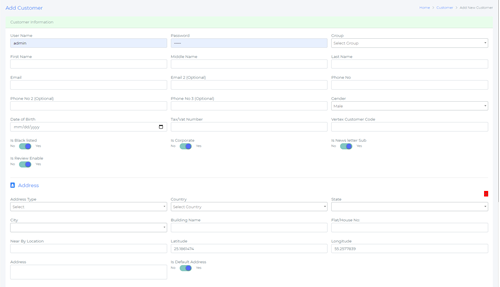
You can fill out all the details and hit the ‘Save’ button. To import customers in bulk from a spreadsheet, click on the ‘Import customer’ button.
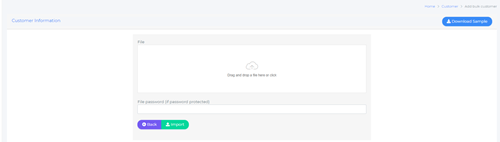
To import your spreadsheet, either drag and drop your file or select the file from your computer. Enter the password, if there is any, and click on the import button to complete the process. You can also download a sample spreadsheet file by clicking on the download sample button on the top-right corner.
You can export your customer list either as a csv file or a pdf by clicking on the respective export buttons.

To filter your customer list, click on the filter icon, and specify the range of customer ID, start and end date, and the status and group of customers and click on the ‘Apply Filters’ button.
5.3 Customer Group
5.3 Customer Group – Version 1
You can group your customers into various categories. Not all customers are equal and it’s easy to manage an ecommerce store if the customers are categorized.
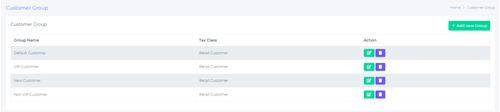
To add a new group, click on the ‘Add New Group’ button. You will be taken to the Customer group information page where you can add details such as group name and tax class. Click the Save button once you are done.
You can edit or delete an existing group by clicking on the respective icon under the Action tab.
5.4 Wallet
5.4.1 Wallet Dashboard
5.4.1 Wallet Dashboard – Version 1

The wallet dashboard gives a complete overview of the wallet transactions of the store. It displays the total amount, total amount in, amount out, current day amount, and a yearly and monthly transaction in and out overview.
Below, we can see the details of the last 10 transactions. Details such as customer name, wallet number, transaction date, type, card number, and amount are shown here.
5.4.2 Wallet
5.4.2 Wallet- Version 1

In this section, you can create new wallets and manage existing ones. To see the details of an existing wallet, click on the wallet number in the list and the wallet transactions details page should open up.
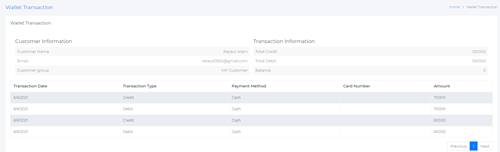
This page displays the customer information, transaction information, and other transaction information such as transaction date, type, payment method, card number, and amount.
To add a new wallet, click on the ‘+Add Wallet’ button on the top right and a new page will open up.

To add a new wallet, you need to first select the customer for whom you want to create the wallet for, enter the payment method, enter the transaction type, amount, and card number. Hit the save button to complete the process.
Chapter 6: Suppliers
6.1 Supplier List
6.1 Supplier List – Version 1
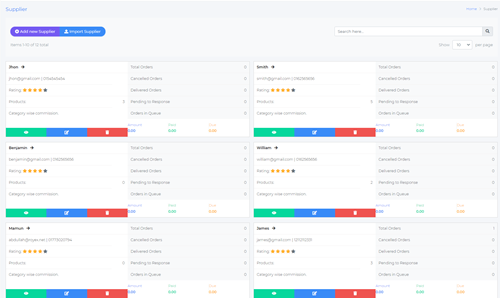
The supplier displays all information about all the suppliers associated with the store. Along with the name of the supplier, the other details that are shown here include: supplier email address, phone number, rating, products, and relevant order information.
To view a particular supplier, click on the ‘eye’ button, to edit their details, click on the edit button, and click on the delete button to remove the supplier from the supplier list.
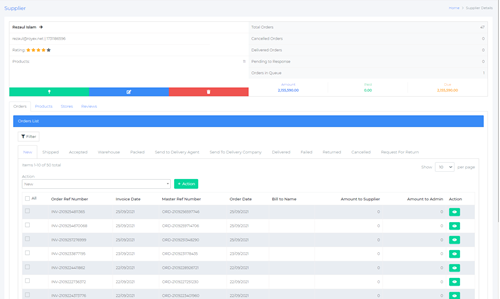
When we view a particular supplier, all their information is available on this page. Along with their basic information and order overview, we also have their order list, products list, store list, and reviews.
The order list shows the list of invoices along with complete invoice information which includes order reference number, invoice date, order date, bill to name, and amount to supplier. This order list is the same as the one that is shown in the order module. We have discussed that extensively in Chapter 1.1.
The product list shows all the products that supplier is offering with the product image, name, type, SKU, and the brand. Similarly, the store list displays the stores that the supplier is associated with. Finally, the reviews section displays the reviews.

Clicking on the edit icon will take you to the supplier edit page. Here, you can change settings such as supplier information, social information, shop details, and policies.
Supplier information
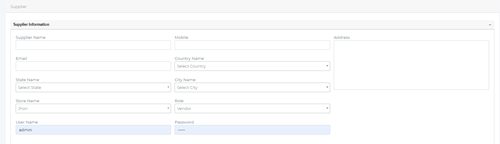
You can edit basic supplier information details such as supplier name, mobile, address, email, country, state, city, store name, and role.
Social information

Here you can edit/add various social media profile links on Twitter, Facebook, Instagram, and YouTube.
Shop Details
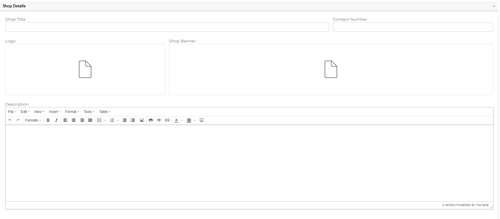
In this section, you can add or edit the shop title, contact details, logo, shop banner, and description of the shop.
Policy
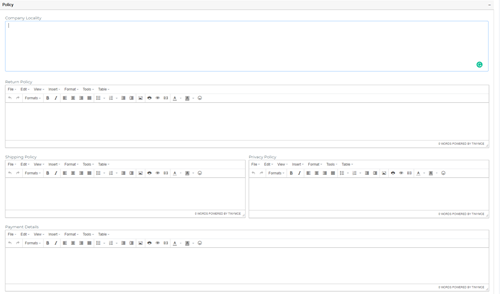
The policy section contains various company policy fields that you can add or edit. This includes company locality, return policy, shipping policy, privacy policy, and shopping details.
6.2 Billing Agreements
6.2 Billing Agreements – Version 1
Clicking on the ‘+Add Commission’ button will take you to the supplier billing agreements page.

Here you select the supplier for whom you want to add a product commission. The commission can be added from the product page.
6.3 Supplier Payments
Chapter 7: Store & Inventory
7.1 Dashboard
7.1 Dashboard – Version 1
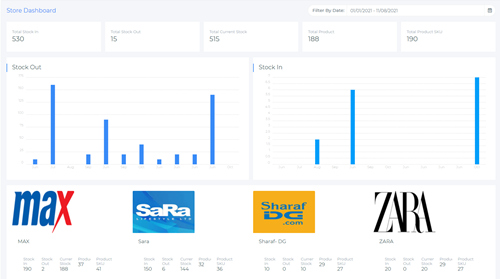
The store dashboard provides an overview of all the stores connected, with the total stocks in and out figure along with monthly graphs, total current stock, total products, and total product SKUs.
Below that, individual information about each store is presented.
Chapter 8: Delivery
8.1 Delivery Agent
8.1.1 Agents
8.1.1 Agents – Version 1
 Here, you will find the driver list which includes details such as their name, license number, license expiration date, vehicle number, email address, phone number, and the address.
To add a new driver to the list, click on the ‘+Add Driver’ button and will take you to the add driver page.
Here, you will find the driver list which includes details such as their name, license number, license expiration date, vehicle number, email address, phone number, and the address.
To add a new driver to the list, click on the ‘+Add Driver’ button and will take you to the add driver page.
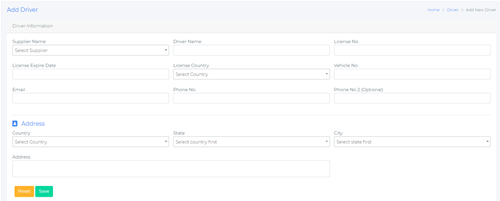 Here you can select the supplier, driver name, license number, expiration date, license country, vehicle number, email address, phone number, country, state, city, and address. Click the save button when you are done. Editing an existing driver involves the same process as before.
To export the driver list as a pdf or a csv file, click on the respective button to download the list.
Here you can select the supplier, driver name, license number, expiration date, license country, vehicle number, email address, phone number, country, state, city, and address. Click the save button when you are done. Editing an existing driver involves the same process as before.
To export the driver list as a pdf or a csv file, click on the respective button to download the list.
8.1.2 Schedule
8.1.2 Schedule- Version 1
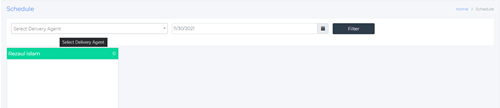
To allocate a schedule, select a delivery agent, date, and click on the filter button.
8.2 Delivery Company
8.2.1 Company
8.2.1 Company – Version 1
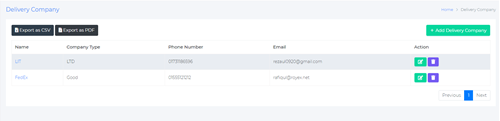
Here, you can edit the details of the delivery companies. To edit an existing delivery company, click on the edit button under the action tab, and the delete button to delete that respective company.
To add a new delivery company, click on the ‘+Add Delivery Company’ button. This will take you to the add delivery company page.

Here, you can add basic information such as company type, company name, supplier, phone number, email address, local cost, outside cost, and payment method.
In the address section, you can add the country, state, city, and street information. In the API info section, you can add the API username, password, API access key, and the API URL.
Hit the Save button when you are done adding all the information.
8.2.2 Schedule
8.2.2 Schedule – Version 1
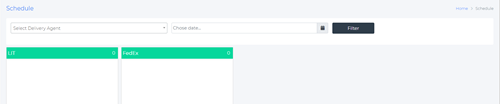
To assign a schedule for a delivery company, select the delivery agent, choose a date, and click the filter button.
Chapter 9: Service Agent
9.1 Agents
9.1 Agents – Version 1

In the service agency list, you can view the list of all service agents along with their details which includes their name, driving license number, vehicle number, email, phone number, and address.
To edit an existing service agent, click on the edit button under the action tab. To delete an existing agent, click on the delete button under the action tab to delete the agent.
To add a new service agent, click on the ‘+ Add New Service Agency’ button; this will take you to the Add agency page.
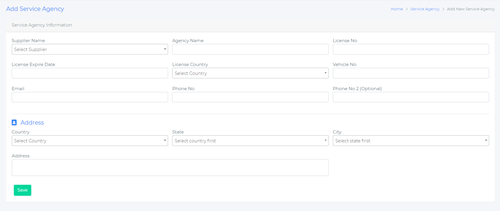
Here, you can add basic service agency information such as the supplier name, agency name, license number, license expiration date, license country, vehicle number, email address, and phone number.
In the address section, you can add the country, state, city, and address. Hit the save button when you are done adding the information.
9.2 Schedule
9.2 Schedule – Version 1

To fix a schedule for a service agency,